Beauty Shot

I did some quick troubleshooting yesterday with the timing and found that my timing gun was set to 10˚ advanced, so the truck is still way ahead of where it should be. It’s also dieseling when I shut it down, which tells me the timing is way too advanced. On our truck text thread the other day, Bennett gave me some things to check over:

  • Time it with vacuum advance disconnected and plugged. Done. It seems happiest when it’s waaaay advanced.
  • Are they the correct spark plugs? And gapped? Yes!
  • How’s the points gap? The gap looked good to me, but it’s hard to get a gauge in there with the condenser and mechanical advance in the way.
  • Have you set the dwell? This one I need to do some more research on. Two weeks ago I tested it and found that it was at 26˚ when it should be 30˚, so some adjustment is required there.
  • Does the timing mark jump around when you add throttle?  No, it’s smooth, which is a good sign.
  • Spray carb cleaner around the carb base and ports to test for vacuum leaks.  I didn’t get to this one.
  • Does the timing mark advance as you add throttle (with vacuum plugged) to test mechanical advance. Check—working as designed.

But she’s still not running correctly, so more diagnosis is required. And until I get the mechanical fuel pump fixed and installed, I’m going to need to wire the electric unit into the switched power fuse panel, because I keep forgetting to turn the damned thing off when I shut the truck down.

In retrospect, I’m very happy I decided to remove the Sniper and go back to the basics, because I would have been smashing my head against the wall for months trying to diagnose software when this a mechanical problem to begin with.

Posted on   |     |   Leave a Comment on Beauty Shot  |  Posted in Carburetor, Travelall

Darth Update

Last weekend, I pulled the Sniper out of the engine bay and tucked it safely away in a box in the garage. The mechanical fuel pump is back on the truck, but it gave me a fight the last couple of days—it wouldn’t prime, and it sits uncomfortably close to the engine mount. Thursday morning I bypassed it with an electric pump and fed the carb directly. Once it fired, the engine tried to run away on me, so I reset the mixture screws to baseline. That’s when I found a huge vacuum leak at the back of the carb. After sealing that up, it settled into a decent idle. I set timing back to about 10°, which feels a lot more reasonable, dropped the hood, and took it for a spin around the block. The choke cable still needs to be hooked back up, but once it warmed up it drove fine. Heavy throttle still causes it to bog, so there’s more tuning ahead, but it’s already a big improvement.

I do want to pull the electric fuel pump off. Now that the lines are primed I want to hook the mechanical back up and see if it will pull fuel; if not, I’m going to pull the trigger on a rebuild kit for the original unit, which fits the truck better in any case.

Meanwhile, I painted the new plywood panel for the rear bed with a marine oil-based primer, countersunk the bolt holes, and rolled on two coats of Raptor Liner front and back. I have some fresh hardware in hand to put it in more permanently, although I have to go back out to get more bolts—the ones they used are an odd thread count for their size.

Lastly, I tore down a spare rear door to salvage the good glass, cleaned the tracks, and swapped it into the red truck. Once I knew the steps, the job was quick and straightforward. While I had the door apart, I pulled the handle, chased out a bit more rust, skimmed it, and gave it a fresh coat of paint.

Posted on   |     |   Leave a Comment on Darth Update  |  Posted in Carburetor, Travelall

Carburetor 101

I’m spending a lot of time going back and refreshing my carburetor knowledge, which means I’m reading a lot of articles and watching a bunch of videos. I’m going to do a link dump here so I can close a bunch of browser tabs.

Posted on   |     |   Leave a Comment on Carburetor 101  |  Posted in Carburetor

Laboring

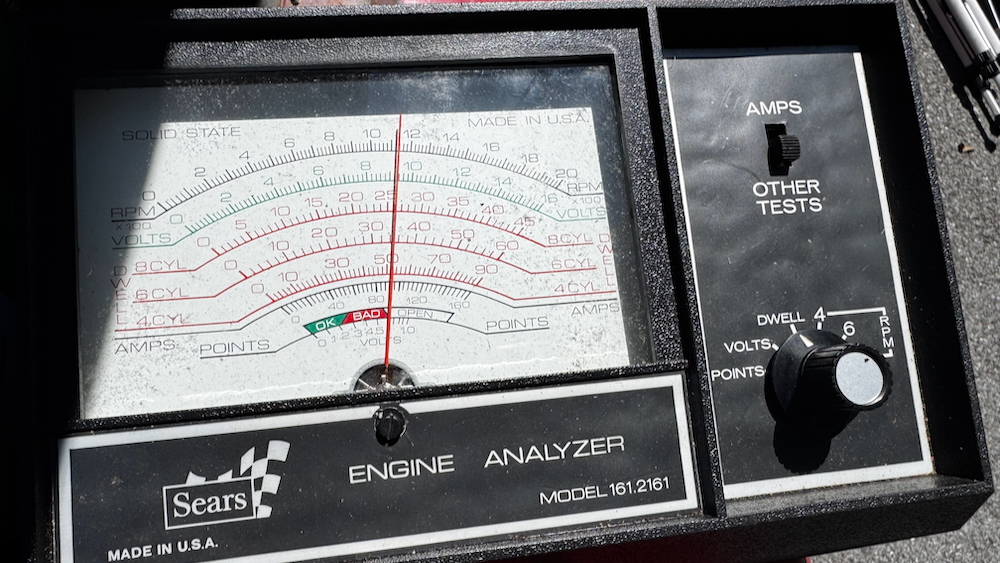
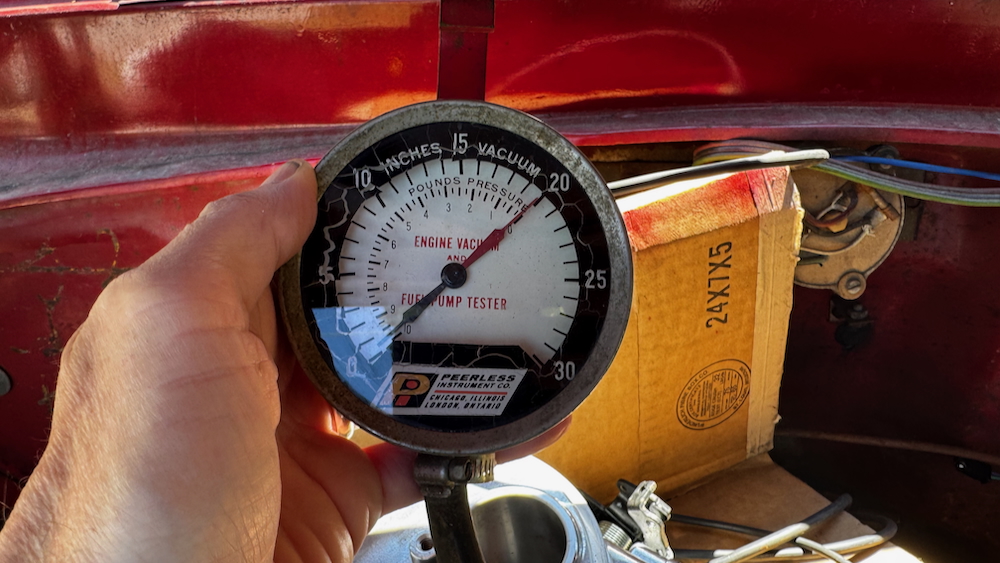
Labor Day weekend we had absolutely nothing planned, so I took advantage of free time and mild weather to focus on getting Darth Haul running reliably. Saturday morning, after walking the dog and having breakfast with the girls, I went out and set up all of the diagnostic equipment I’ve collected for carbureted engines: a vintage dwell/tach/volt gauge, a vacuum gauge, and a  timing light. I hooked the boat tank up to the engine and painted marks on the flywheel and timing marks with a white Sharpie, then ran it up to temperature. Messing around with the distributor, I found that it was happiest running at over 20˚ of advance, which is definitely not the way it should be. Anytime I brought the timing back down to a comfortable 10˚ the engine got choppy and began to die.

I put the light on the Scout just to see where the baseline for a smooth-running engine was, and verified that was at around 8˚, which is what I remembered from the service manual. No amount of distributor adjustment could get it to calm down. Puzzled, I zeroed out the carb and adjusted the mixture screws and the idle to get the engine to slow down, and was happy to find that the stumble at acceleration was gone. At idle I was pulling 20 inches of vacuum pressure. With the engine running better (but not timed correctly), I took it for a spin around the block and was happy to find it didn’t stall out once. I also noticed the speedometer isn’t working.

At around this point my Harbor Freight timing light died, so I had to run out and get a replacement. Strangely, it took a while to get the truck to start when I got back; I’d left it at 10˚ or so, and had to adjust it a bunch before it would catch again. I continued messing with the timing but couldn’t resolve the issue. Stumped, I stepped back and cleaned the truck up as much as possible for Cars & Coffee the next morning: I swapped out the old wood floor in the back for the new one, swept out the dust, and cleaned all the windows.

DSC00071

Sunday morning I made some coffee and ran the truck up in the driveway before taking it for a spin down the road. I pulled in to C&C and parked it next to a sexy Morgan 8, and I was soon joined by Bennett in his Speedster.

DSC00097

The Travelall was an immediate hit with the crowd; I got a lot of questions about what it is and where I got it, as well as whether I’d driven it a long ways with the boat tank. We had a good turnout, and at one point I was parked across from an Acura NSX and a McLaren.

DSC00089

Back at the house I did a bunch of straightening up in the garage, and David stopped by to pick up a bunch of parts I’d sourced for him at Nats and elsewhere. I was able to pass along the passenger fender and 6-cylinder air cleaner from Ohio, as well as a set of metal door cards I got in Pittsburgh, a pair of escutcheons, and the two eyebrow sections I’d cut off the truck in New York. He was super-happy to take delivery, and headed back to his house to get his truck running after a long pause.

One thing he mentioned to me was that he’d talked to a local spring guy about rebuilding his spring packs, and was quoted a  reasonable price to do so. I was VERY intrigued to hear about this, as my springs are also as flat as a board. This would be an excellent fall-winter project, as it would require jacking the truck onto stands and pulling the springs off.

Sunday afternoon we ran a bunch of errands but after getting back home I put my spare door on the worktable and started breaking it down to pull the glass out. What I wound up having to do was take the black inner surround out, pop the clips holding the felt out, and prep the top half to be able to slide the rails and window out as a unit. Both of the screws holding the lower ends of the rails were, predictably, rusted solid, so I hit them with PBblaster but resolved to cut them out with a death wheel. The only angle grinder I’ve got that fits inside the door is the cheap pneumatic one I got from Harbor Freight, and here I was stopped dead by a leaking/broken moisture filter on the compressor. After picking up some new fittings I repaired that after dinner, and got things ready to start on Monday morning.

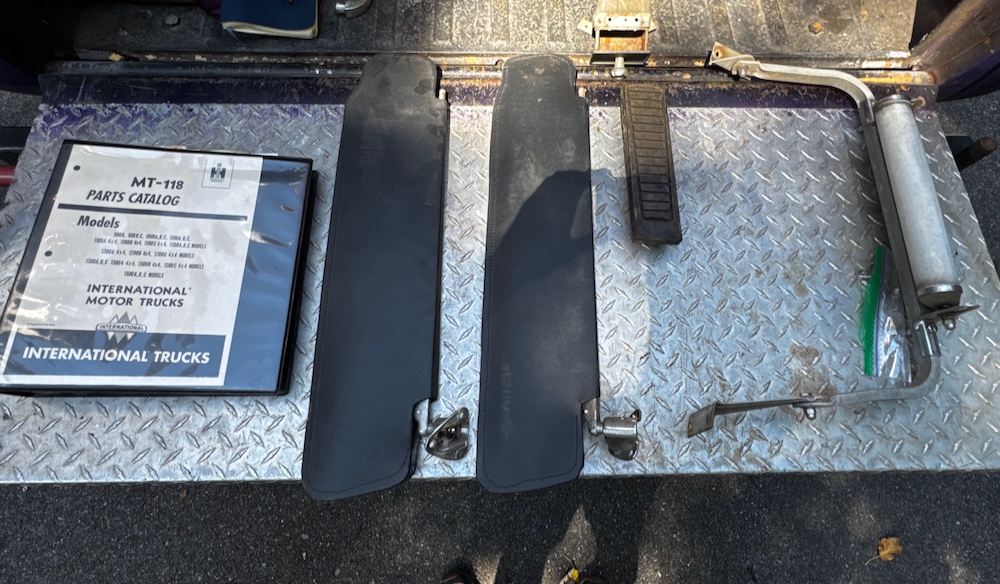
A few weeks ago, Bennett had gotten a call from a guy who had a mixture of old pickup parts and passed along his info to me. There were some pictures of C-series stuff that I was partially interested in, so after walking the dog and doing some chores around the house I drove a half an hour north to meet up with him. In his garage he had boxes of assorted parts, which I picked through carefully. I wound up going light: a reproduction MT-118 parts catalog for A, B and C-series trucks, a pair of beautiful black C-series sun visors, an ashtray in great shape, an NOS accelerator pedal, and one mirror assembly to pass on to Tyler out in Frederick.

Between odd jobs around the house, I fired up the compressor to notch the two screws at the bottom of the green door enough to turn with a screwdriver, then gently pulled the rails out to free up the glass. When that was done, it was easy to get the glass out. It’s in good shape, and after I wire-wheeled the metal bracket at the bottom, I taped it off and sprayed it with Rust-Stop. Getting the broken pane out of Darth is going to be a challenge, but now I know what I’m doing, and barring any major rust issues, it should be relatively straightforward to swap the glass in.

I also couldn’t help myself and swapped the black visors into the truck. They’re just a little bit longer than the gold ones that came out of the green truck, so they don’t fit into the clips next to the rearview easily. But they look great!

Posted on   |     |   1 Comment on Laboring  |  Posted in Carburetor, Friends, Purchasing, Travelall

Musical Carbs

I had a plan going in to Sunday morning, after sitting back and thinking about all of the symptoms I’ve been facing with the carburetor. Typically when i’m working on mechanical or computer problems I’ll diagnose things backwards until I get to something I know is working. Then I move forward until I’ve identified the fault. On the carburetor, I knew that the engine spark timing was off, and the only good way I know to adjust that is to loosen the distributor while the engine is running and spin it slowly until the idle smooths out. 

I figured the best way to do this was to put the old Holley 2300 back on the engine and work through the problem mechanically. Unbolting the Sniper from the engine, I put it aside, resting on some cardboard, and disconnected all of the wiring. I pulled the old  carb from one of my spares bins and swapped it onto the engine, plumbing it to the boat tank through an electric fuel pump. With a couple squirts of 50-1 gas in the throat, the engine fired right up but sounded very choppy and died off after about 10 seconds. I got a couple of backfires out the throat of the carb—a sure sign of bad timing.

After verifying this was consistent behavior, I got it running long enough to get out to the distributor and slowly twist until the idle smoothed out and the throttle picked up. Then I tightened the mixture screws (they were wide open from last fall, when I was battling the dead condenser thinking it was a fuel issue) and adjusted the throttle until it was idling happily by itself. 

Relieved, I let it run for about 10 minutes and shut it down, figuring it was warmed up enough to give the Sniper a hand. The learning feature in the Sniper control unit kicks in after the engine is warmed up past 160˚, and that was what I was shooting for: I wanted it to learn how to adjust the fuel/air mixture and self-meter. Friday evening I’d pulled the water neck open and examined the thermostat that was in the engine. I figured I’d find something crustier than a wino’s beard but the passages and thermostat looked almost brand-new, which was a pleasant surprise. I put a new 180˚ unit in and closed it back up.

I hustled around the engine and got the Sniper back in place in about 10 minutes, verifying I had reconnected the electric leads to everything, said a Hail Mary, and fired it off. It started immediately, and ran a lot smoother than it originally did—but was still hunting for the right fuel/air ratio, surging and fading. I let it run for a couple of minutes, noting that the temperature was reading 178˚ but knowing that the radiator wasn’t full, and shut it down after watching the Learn setting on the control unit struggle to balance things out. 

I tried to restart after a couple of minutes but the battery sounded tired, so I hooked the tender back up and let it cool down. The Sniper says it’s reading 14 volts when the engine surges, but I’d bet the alternator is dead so I’ll source a new one after I verify its condition. 

So: I know that the timing on the engine is set more correctly than it had been. I know that the Sniper will start the engine and run more consistently than it had been. I know I probably need to adjust the timing settings in the control unit again to better match the engine, and I know that the water passages are clean—but need more coolant.

With a little more time to kill, I got my 3M automotive tape out and finally put the International badge on the rear door. Looking at the rear quarter, I decided I wanted to add the Travelall badge that belonged there too. With the taillight removed I was able to see where the bondo had filled up the original mounting holes and used a chisel to carefully scrape it away to where I could see them. Then I drilled them out and widened them until the posts on the badge fit the holes perfectly. With some more tape the badge went on easily, and now the truck looks even more legit than before. 

Back to Life

Getting Darth started and running has been at the top of my list for the last month, and it’s been postponed by bad weather. Jen was out of town this Saturday and I wanted to take advantage of that—she hates the exhaust fumes—so I got to work as soon as I could. The first issue was fuel. Last weekend I had her running off fuel I poured in the carb but I couldn’t get her running long enough to pull fuel up into the filter. The other issue was that the negative battery cable had given up and was getting hot to the touch almost immediately after cranking, so I swapped in a new one.

I started out yesterday by hooking my electric pump up to the hose right below the filter and verifying that the pickup wasn’t blocked. With that setup I got her idling roughly off the boat tank, having to stay next to the carb to alternately adjust the choke and accelerator. I backed the idle screws out a quarter and then a half turn with no effect, and kept her running for about five minutes before shutting her down. The idle is more of a gallop, which definitely points to fuel issues, and it’s different than when I had her running last year. The good news is that the exhaust is clear—there’s no white or blue smoke.

I pulled the electric fuel pump off and tried running it off the mechanical unit with no luck. Figuring something was wrong with the mechanical unit, I jacked up the front end, crawled underneath, and pulled it off. It was full of fuel, and I couldn’t see any issues with it—no leaks or damage. So I put it back on, tightened up the connections, and figured I’d sit back and have a think.

The easiest and quickest solution is to just buy a new pump (and a couple of filters), but before I fire the parts cannon I want to review what I know and see if there’s anything I’m missing. The way I’m seeing it, the next move is:

  1. Replace the fuel filter and see if it’ll pull from the tank. If not,
  2. Put the electric pump on to prime the mechanical pump, and see if that cleans up the idle. if not,
  3. Replace the mechanical pump and see if that pulls from the tank.

That took the better part of the morning into the afternoon, and by then the wind was picking up. It started as a warm day but got colder as a front moved in, so I did some minor stuff inside the cab and then moved to the garage. I cut a new pattern for the bench seat support out of 20 gauge steel, measured and marked everything out, and trimmed it up. Then I screwed my bender into the floor and carefully aligned things up. 20 gauge steel is much easier to bend than 16 (what was I thinking) and in about an hour I had a new support formed, with the final adjustments to be made when I cut the old piece out of the truck.

While I’ve got the girl up on jack stands, I’m going to spray the area between the clutch and flywheel with some PBblaster to see if I can get the two to separate. If by some chance I can free things up, I can avoid a costly tow and transmission job, which I’d love to be able to do.

Posted on   |     |   Leave a Comment on Back to Life  |  Posted in Carburetor, Travelall

New Carb

Bennett is now rocking fuel injection on Mr. Hanky, so he figured he’d ditch all the 40-year-old technology sitting in his garage. As we were beginning to wrap up with the project last week he walked out of the garage and handed me a spare Thermoquad he had sitting on a shelf somewhere. “I’m not going to need it,” he said confidently.

I put it on the bench this evening and looked it over in comparison to the known good International carb I’ve got already. The new one has a bunch of gewgaws and linkages and levers hanging off the body that I’m not familiar with; that’s because it was built for a 1979 California-market Chrysler 360 with an automatic transmission.

For comparison: the one on the right is a carb manufactured for International Harvester. The new one is in pretty good shape, so as a spare it’ll be good for spare parts. I realize at this point I just need to accept that I’m not going to finish the carb I’ve got and call the guy I met who rebuilds carbs for the  International dealer up the street.

Posted on   |     |   Leave a Comment on New Carb  |  Posted in Carburetor

Injected

As shown in the time-lapse I posted earlier, we made some serious progress on Bennett’s injection project. Brian stopped by my place at a little after 8, chilled from a top-down ride over the bridge in the white Scout, so I made him a cup of coffee and we got him warmed up before humping a cabinet up into the new bathroom and then hitting the road.

DSCF6878

Bennett had an array of tables set up in the driveway with Brian H, and they’d organized parts but waited for us to arrive before tearing anything down.

DSCF6868

The Brians crawled under the truck to start dropping the tank while Bennett and I looked over the instructions for the carb and began yanking hoses and linkage off his mud-caked Thermoquad.

DSCF6876

Soon we had the intake open and clean and started test-fitting the mounting plate, got the new throttle-body mounted, and started working out the wiring.

DSCF6879

In back, Brian braved buckets of mud and rust falling into his eyes to get the tank dropped and mount new hoses, then installed the fuel pump under the driver’s door.

DSCF6891

After a quick lunch, we got back at it and re-hung the fuel tank while Bennett drilled a hole in the firewall to pass the new wiring loom through to the glove box. At about 3 Brian and I had to head out so that we could make it to the junkyard before closing, but we left Bennett in good shape with most of the heavy two-person tasks complete (re-mounting the fuel tank is a pain in the ASS).

At the junkyard, we were looking for an electric steering motor from a Prius, a Versa, or a Kia Soul to modify the manual steering he’s got in the white Scout. Crazy Ray’s was bought by a national conglomerate a while back (it’s been a year or two since I’ve been) which means they now have an app that lists the inventory at all of their yards (!!!) and the stock is all lifted up on welded steel rim jack stands. They’ve cleaned up the operation a ton and it’s much easier to find things now—they even provide rolling engine lifts.

We found the one Prius in the yard but the motor was already gone, so we moved on to the Versa. After some digging under the hood (I figured it would be at the end of the steering shaft in the engine compartment) I was ready to give up but Brian looked under the dashboard and realized it was integral to the steering column. Once we figured that out it was an easy thing to tear down the dash and pull the unit out.

We made it out of the yard at closing time, said our farewells, and headed home. Turns out we left some of the required parts behind—we needed to grab the control module and something else, so he’ll have to go back and grab those things this weekend.

Posted on   |     |   1 Comment on Injected  |  Posted in Carburetor, Friends