We May Have This Beat

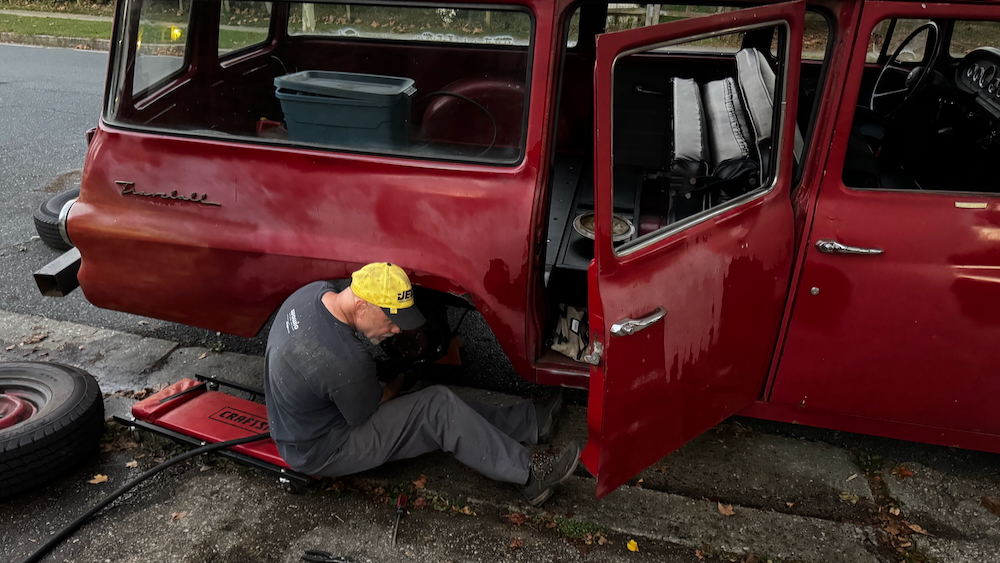
I think I’ve got the brake situation on Darth Haul pretty much licked—but it’s going to take a little more adjustment before I’m happy. When I last wrote about this, I was waiting on a master cylinder from Rock Auto. I wound up installing that, and as I took the 2-year-old unit off the firewall, I found that the pushrod for the clutch fell inside the firewall, while the pushrod for the brakes stuck out into the engine bay by an inch or so. This pointed at the cylinder being pressurized as I hit the brakes, but not able to release all of the pressure when the pedal was let back out, thus building up over time as I drove and braked.

So I unscrewed the adjustable pushrod and lopped about 1″ of length off of it, and put it back in the truck. I found that I’d taken off way too much and that I wasn’t getting any brakes at all. So I measured the threaded side of the pushrod, then bought a couple of 7/16 bolts with 20 pitch thread and used an angle grinder to fabricate a new pushrod.

After spinning a jam nut down on the threads, I put it back in the truck and gave it a test, but found I wasn’t getting enough brake, and needed more length. So I fabricated a third pushrod and installed that one, and this time I got some stop in the pedal. It still needs some fine tuning—I’ve got to stand on the brakes to stop quickly—but after a 15-mile drive the wheels were cool to the touch and the truck wasn’t struggling against itself.

Now I’ve got to do some tightening up on the front suspension. The tie rods and bushings are all toast, so I have to order new hardware for all of that, as well as pick up a working grease gun (both of the units I have here, circa the repo agency from 1988,  seem to be broken) to lube all the important bits.

Brendan left me a couple of goodies up at Dan’s place a few weekends ago, so I made the most of the trip by hauling a load of broken concrete from our backyard up to the landfill on that side of town in the Scout. His place is right around the corner, so I quietly backed into the side field so as not to disturb his family. Brendan dropped a proper 16″ IH wheel in the driver’s seat of the blue 80 for the Travelall and told me to just take the rollbar out of that truck. I was able to get one of two bolts out with a wrench but had to resort to a portable cutoff wheel to get the other out. With that, the bar was free, and I hauled both parts back to Peer Pressure to head home.

The wheel is exactly what I needed. I’ve got three originals on the truck but the fourth is one I got from a guy on Marketplace, and while it fits the truck, the mounting boss is a different size than the others so I can’t mount a hubcap on it. I wire-wheeled the whole thing, sprayed the outside white, and mounted it on the truck.

With the hubcap on it really brings out the white in the top and makes the truck look sharp. I liked it so much I used the playing card trick to spray the rear wheel white as well. Something else to look into are different tires; the ones on the truck are technically for a trailer, and I’d like to have the right kind of rubber on the truck. It’s an odd size so it’s going to take some searching to find the right thing.

While I was at the Hobo Freight I picked up a bottle of cutting compound and a couple of orbital pads, and gave it a try on some of the red paint with the worst oxidization. It took some experimentation and practice, but after a little while I had the original paint as shiny as it’s going to get, punctuated with areas of rattle-can IH Implement red covering repairs I’ve made. I did the entire passenger rear quarter up to the point where my sheet-metal repair starts (and the spray paint is fading) and both doors, and it looks worlds better. It’s not going to save the peeling clear coat but it’s better than it was.

Quick Update

Lots to write about, but not much time this morning:

  1. The Travelall brakes are still broke. I believe it’s the master cylinder at this point, so I’ve ordered a new one from Rock Auto, which should be here Wednesday. I replaced the entire hardline setup last week as well as the softline on the passenger side (which I’d overlooked two years ago).
  2. The 800 is not starting. I tested it from the key forward, and the coil is getting power but is hot to the touch, which tells me it’s toast. So I’ve got a new coil coming this week as well.
  3. Peer Pressure, as usual, is running like a top. There’s a whine from the power steering pump, which is leaking slowly, and the exhaust on the passenger side needs to be tightened again, but she made it over and back from Chestertown with zero issues. She is my rock.
  4. Project Slowflake is making progress! I spent two days with Brian mounting the power unit to the transmission (the custom aluminum adapter plates are SEXXXXXXY), welding supports up to the front battery tray, and re-configuring the PMU location for the thirteenth time—but we got it sorted. Stay tuned for updates there as well.

This video is two weeks behind, but should begin to catch up on the progress:

Posted on   |     |   2 Comments on Quick Update  |  Posted in Brakes, EV Swap, Friends, Scout 800, Travelall

Broken Brakes

Sometimes you have a workday where everything seems to fall in place and work correctly, and sometimes you finish the day where it feels like nothing was accomplished. This weekend was mostly the latter. I spent just about the entire weekend on the brake situation in the Travelall, and as of right now I still don’t have anything to show for it.

I started by doing a short test run to get the truck warm, and then brought it back to the driveway to check the drums. The driver’s front was the hottest, so I put the entire truck up on stands and pulled all four wheels. Each drum was warm to the touch and didn’t spin freely, which told me they weren’t releasing properly. So I bled them starting at the far corner with my daughter’s help, put the wheels back on, dropped it onto the ground, and did another test run.

After the second run the drums were still hot, which pointed to a possible problem with the master cylinder. When I originally replaced it, I bled it on the truck instead of the bench (rookie mistake), so I figured maybe there was air still trapped in the cylinder. I rigged up a bleed tube, disconnected the brake system, and bled it out again. I did get some air out of it before it went clear, so I figured maybe I was home free. After dropping it back on the ground, I bled it at the wheels again and prepped it for a test run.

Sunday morning I took it back out for a drive, and back in the driveway I found that the driver’s front drum was still hot to the touch. This was frustrating, but I kept my cool. I figured I would replace the only two elements that still exist from the original brake system: a long hardline going from the prop valve to the rear axle and another going across the front of the frame to the passenger front wheel. As I’ve bled the system the fluid has been coming out dirty, so there’s a good chance there’s some crud in those lines that isn’t letting the pressure release.

I tackled the long line first, and was lucky to have just enough left to reach— it’s 9 feet in total—so I ordered another length of 1/4″ line from Prime and got to work heating and cooling and heating and cooling the fittings. The rear fitting came out relatively easily but it took an hour of patiently working on the front fitting before I felt brave enough to put a wrench on it. While that was happening I pulled the old line off and used the needle-scaler to remove surface rust on the inside of the frame rail behind the mounting points, and hit it with Rust Encapsulator. Then I put the new line in place, double-flaring the ends, and tidied up the wiring on that side.

Up at the prop valve, I decided to split the line and slide a box-head wrench up to the nut so that I was getting all the contact area possible, and then with one mighty heave, it came loose. After that it was relatively easy to double-flare the other end and tighten it on the valve.

By this time it was getting dark, but I worked until about 8PM heating and loosening the nut on the other side of the valve and pulling all of the retaining clips off of the frame. While I was under the truck I tidied up the wiring on the passenger side and found that when I’d re-connected the gas tank sender wire I never covered it with anything (there was an unused section of heat shrink tube on the wire, so I had all the best intentions) so I cleaned those connections for testing later.

The front line is going to take hours, I suspect. It’s in a difficult location to get to. The end of the line is mounted up on the frame behind the tire, right next to the starter, so there’s little room to move. I suspect I’ll have to remove the starter and spend a lot of time heating and juicing that line as well.

If this isn’t the issue, the way I see it there are only two things left that could be the problem: the short soft line going from the master cylinder to the prop valve, or the master cylinder itself. I’m thinking I’m going to order the soft line just to rule it out (it’s pretty cheap in any case) before spending $80 on another master cylinder, just to make sure I’m not firing the parts cannon prematurely.

Posted on   |     |   Leave a Comment on Broken Brakes  |  Posted in Brakes, Travelall

Back and Forward

When we last left off, I was rebuilding the original Carter glass fuel pump that came on Darth Haul. I did that two weekends ago but had to wait on re-installing it around work and the weather. At lunchtime last week I ran outside and put it in, filled the carb bowl with gas and started the engine, keeping an eye on the fuel pump. After three tries it wasn’t pulling any fuel.

I brought the spare from the green truck inside, tore it down, and cleaned that one up. I replaced two of the rubber valves and put it back together, and the valves worked when I tested them. On Saturday I swapped that unit in and repeated the process, but it wasn’t pulling fuel either. I brought the original back to the bench, preloaded the main valve properly, and swapped it back in the truck, but it still wasn’t pulling fuel. Frustrated, I gave up, ordered an adjustable pressure regulator on Prime, and turned to other things.

One of those included a dump run, so I loaded up the Scout and took her out for a test spin—the first long drive after replacing the rotors. This went flawlessly; the brakes feel great. They’re even and smooth, and the truck doesn’t jerk to the left anymore. And most importantly, they’re not cooking the wheel hubs like they were before. I’m going to jack up each side and tighten the bolts one more time, but I think that task is complete.

The regulator showed up Sunday morning so I pulled the hose off the mechanical pump and put the electric pump back on, followed by the regulator and a transparent filter. The engine turned right over and the idle settled down after I opened the choke up all the way. I did three test drives: one around the block, one around the neighborhood, and one to Ellicott City to get my hair cut. The truck ran perfectly, and most importantly the front brakes stayed cool and free, which means my second bleed of the system seems to have worked.

I’m not happy about having the electric system cobbled back in, but I’m tired of futzing with the mechanical system right now, so I’m going to stick with this until the spring and sort out the issues then.

Next up, I’ve got some small things to tackle and then some big ones:

  • It sounds stupid, but I’d like to have dome lights in the truck. The lead for the light exists and it does have power, but I’m unclear as to how the circuit is switched on and off. If it’s anything like the Scout, the light switch on the dash controls the dome circuit (there are no door switches) but it shouldn’t currently be live like it is. I’ve got four original IH dome lights ready to be wired in series—two for over the seats and two for over the cargo area; I just need to read up on the wiring diagram for these. Oh—and this will require…
  • Installing the headliner bows. I’ve got these etch primed and ready for paint, but don’t have a headliner solution in hand.
  • It would be nice to have a speaker wired into the dash for the radio; there’s a spot for a single 4″x10″, but I have to buy something to put in.
  • I ordered some stuff from SendCutSend last week: two pairs of lock latches for the seat box that are slightly longer than the ones that came with the locks, as well as a new improved version of the cupholder mount. The latches should be long enough to actually lock, and I can then store tools and parts in the truck securely. The cupholder is modified to have wider openings for the cups so that I can add rubber sound deadening around the openings, and narrower at the flat section so that it doesn’t collect so much dust. I also added holes for the mounting bolts. This will get welded up and prepped for install this week.
  • The rear floor is completely unbolted from the truck because I want to pull the rear springs out and have them rebuilt. Doing this with the floor out will make life much easier, but I’m going to wait until the roads get salty and I’m not driving her as much.
  • I also want to cut out the crappy floor repair on the driver’s side and replace it with new sheet metal. It’s going to take one flat sheet of 24″ x 32″ steel, with a slight bend at the front side and a gentle lip on the A-pillar. I’m going to have to pull the front bench up and drill out a couple of the spot welds on the vertical bench support to get underneath—the rot goes under the corner support I built this spring, so that’s going to take some careful surgery.

Meanwhile, there’s a good chance the stash of trucks up at Dan’s house includes a 16″ wheel with a 4.5×5 bolt pattern, which I would love to swap for the mismatched wheels on the driver’s front of the truck. There’s nothing wrong with the wheel itself other than it won’t accept a fancy IH dome hubcap like the other three, and I would like to be matchy-matchy before I paint them all white. We’re still waiting on the family to find titles for the two 800’s up there so that Brian and I can buy them and haul them off.

Build Season on YouTube has a great two-part series on reviving a D-series pickup, which is great to see:

Brakes: Check

After a couple of weeks of fits and starts, I focused on the front brakes of the Scout Saturday morning. I’ve been held up to date by incorrect or missing directions on how to disassemble the locking hubs on the front axle, the roemoval of which is required for getting the rotor assembly off the truck. All of the various service manuals talk about a particular snap ring that needs to come out before pulling the hub assembly out (at the risk of dropping a handful of roller bearings all over the driveway, a terrifying thought) but I could not identify or find this snap ring anywhere. Finally, I decided to chance it and gingerly pulled the hub assembly off—and found that there was no snap ring and that the inner gears came off with the outer assembly.

With this out of the way, it was easy to remove the caliper, pull the rotor/hub assembly off, and pounded the studs out from the back side of the old rotors. With a hammer and socket extension I pounded the studs into the new rotor assembly, and put everything back on the truck. The driver’s side went just as easily, although the locking hub mechanism there didn’t have the same washer/snapring holding the gears to the outer assembly. Looking it over, I don’t think that makes a difference, so I put it back the way I found it (it’s worked just fine for 17 years) and buttoned up the wheels.

Out on the road, the brakes feel very good: they’re even and don’t immediately pull to the left side, which is a huge improvement. There’s a noticable difference in the pedal feel—before, the brakes were very close to the top of the pedal, where now there’s more throw before they engage—but I like that. It’s going to take a little getting used to, but I’m really happy I tackled this and did it myself.

In other news, I posted four new designs to the Threadless store. I’ve been sitting on the two Scout 800 designs for a year or more, for reasons I can’t remember. The Slowflake design is in honor of Brian’s Scout project, and the Dugan’s Beer bottlecap is for myself. I’m noodling with some new ideas for Slowflake after the EV conversion, at which time I’ll create another design.


Posted on   |     |   Leave a Comment on Brakes: Check  |  Posted in Brakes, Design

Weekend Update

I got the driveshaft back for the Travelall on Thursday. They wound up completely rebuilding what I brought them: they put a new yoke on either side of a larger driveshaft and connected that to the original slip shaft from my truck. The old driveshaft was 2 1/2″ in diameter and this new one is 3″ so there’s some extra beef. I hit it with some self-etching primer and black paint on Friday afternoon and let it cure in the sunlight. Saturday morning, after running some errands, I crawled under the truck and put it back in. This was straightforward, and when it was done I took her for a run around the block. I wound her up as fast as I could close to the house and it looks and feels like the vibration is gone—which is excellent news. I felt so good about it, I took the truck out three times over the weekend to run errands.

Then I put the Scout up on jack stands and started tearing into the hub on the passenger side in order to swap the rotors. All of the videos that I have seen talk about taking the faceplate off, then pulling a snap ring out before removing the outer section of the housing. None of the videos show exactly where that snap ring is, and I don’t see it on my hub anywhere. I pulled the driver’s side off to see if I was missing something, but that looks exactly the same as the passenger side. My spare hub is a completely different design, so I can’t use that as a baseline. So I put the whole thing back together to cogitate on it a little longer.

Doing some organizing in the garage during the weekend, I went looking for some weatherstripping and stumbled on something I forgot I had: a used speedometer cable from the green truck. As soon as I saw it, I wanted to slap myself in the head, because it would only make sense that I would save something like this. Brand new, these cables are $60, so this was a great find. I cleaned the grease off it, filled it with silicon spray and put it in the truck. The needle hops around a bit, but it’s working, and the odometer spins, which is great news, because now I can track gas usage again.

Another quick thing I looked at were the locks on the lockbox under the rear seat in Darth. I’ve had these finger-tight since I put them in, and now that the truck is on the road I need some secure storage. Both sides have needed adjustment since I put them in. The driver’s side needs a new slot to be cut into the side of the box for proper alignment with the key, and the passenger side needs a longer catch made for the lock mechanism. I think I’m going to draw up a design and have SendCutSend cut me two new ones instead of trying to cut and fabricate one here. Along with that, I have two modifications to make to the C-series cupholder I designed—I want to increase the diameter of the cup cutouts by at least 1/2″ to allow for some rubber bumpers around the edge, add a little more height to the gusset at the bottom, and have them cut the two bolt holes for the seat hoop. So I’ll gang those two orders up and maybe save a little on shipping.

Posted on   |     |   Leave a Comment on Weekend Update  |  Posted in Brakes, Repairs, Travelall

Braked

Well, this weekend was a journey. Mostly a good one; a lot of good stuff got accomplished, and I spent a bunch of time with friends, but it wasn’t without its challenges.

We had a workday scheduled at Brian’s place in the country to work on Heavy D, Bennett’s long-sidelined pickup waiting for welding repairs, a windshield install, and re-assembly of the front clip. The last time I was out there I’d bent and formed a complicated section of metal to weld to the front of the firewall but Brian’s commercial welder was too strong to work the sheet metal without blowing through it. We were also going to help Brian move his pickup around and place the bed on the frame to free up space, and see what other stuff we could get up to.

My plan was to drive Darth Haul out there for her first short-distance trip, so I worked on the engine timing and fuel system on Thursday. I was having issues with the fuel pump pulling debris from the saddle tank up into the pickup and clogging it, so I rigged the boat tank up with a length of hose and put it on the passenger floor. After loading up my tools, welder, and welding bin, I hit the road at about 9 and took my time getting out there. Brian’s place is about 20 miles away, and I took back roads to avoid any high-speed sections. The truck did very well! Shifting is smooth, the engine is strong, and the brakes worked well. I noticed a vibration at 40mph and heard some rubbing in back, which foreshadowed later events.

At Brian’s house, I helped he and Bennett to clean out Mr. Hanky, because our friends Chad and Liz were coming down from Pittsburgh to possibly buy it. Bennett has had it up for sale since Nats in order to free up cash and space for a cleaner Scout, and they’ve been in the market for another project for a while. They arrived at 11 and he showed Chad the truck while we caught up with Liz. By 1PM the deal was done, and we helped them load the trucks up with a pile of extra parts. It was bittersweet to see Hanky drive away, but it’s great to see him going to a good home—it reminds me so much of selling Chewbacca to Carolyn to give to Brian—I know they’re going to do a great job reviving him.

After moving Brian’s pickup and freeing up a bunch of floor space, we had pizza delivered for a late lunch and then set to work on Heavy D. The first big task was to re-install the windshield, and luckily the rubber was designed exactly like what I put in Peer Pressure, so I knew how to align it in the channel. Between the four of us and with judicious use of glass cleaner, we got it in place and then used plastic putty spreaders to guide the edges into the channels, then fold the locking flap over.

With that done, I set my welder up and put the patch in place, ground it down, and got it ready for paint while Brian and Bennett started hanging fenders. Within about an hour we had the truck put mostly back together and ready for a test fire. The carb was mad at being ignored for a year, and didn’t want to run properly, so Bennett will have to go back and diagnose that. By 5PM we wound down and set course for home. I took Bennett back to his place, but noticed the truck working harder as we drove. Stopping for gas I found all four wheels hot to the touch, which told us the brakes were dragging. By the time we got to his house the passenger rear was smoking slightly. We pulled the wheels off and cooled them down with a hose, then banged the drums off with a hammer. The pads were all the way extended, which meant that the system wasn’t releasing pressure. It was getting dark, so he gave me the keys to his CR-V and I drove that home after parking Darth in his driveway.

The next morning I got there at 9 with all of my brake tools and fluids, and we started troubleshooting the system. After tearing apart and rebuilding the rear drums three times, we tested the master cylinder upstream and verified it wasn’t the lines above either axle. So we disconnected and bench bled the master until it looked clear, then connected everything back up to test. It looked like the brakes were grabbing and releasing, and a test drive verified this. While under the truck I also noticed a huge dent in the driveshaft, which explains the vibrations above 40MPH.

I packed up my tools, extended my sincere gratitude for Bennett’s knowledge and time, and set course for home. She ran well and didn’t feel like she was struggling the farther we went. The brakes and clutch felt good, and I got her home with no problems. The wheels were hot when I checked them after parking it, but not scalding as they had been before. It may take another bench bleed to really kick the issue, but for now, I’m happy she’s back in the driveway.

Posted on   |     |   Leave a Comment on Braked  |  Posted in Brakes, Friends, Purchasing, Travelall, Trip Logs