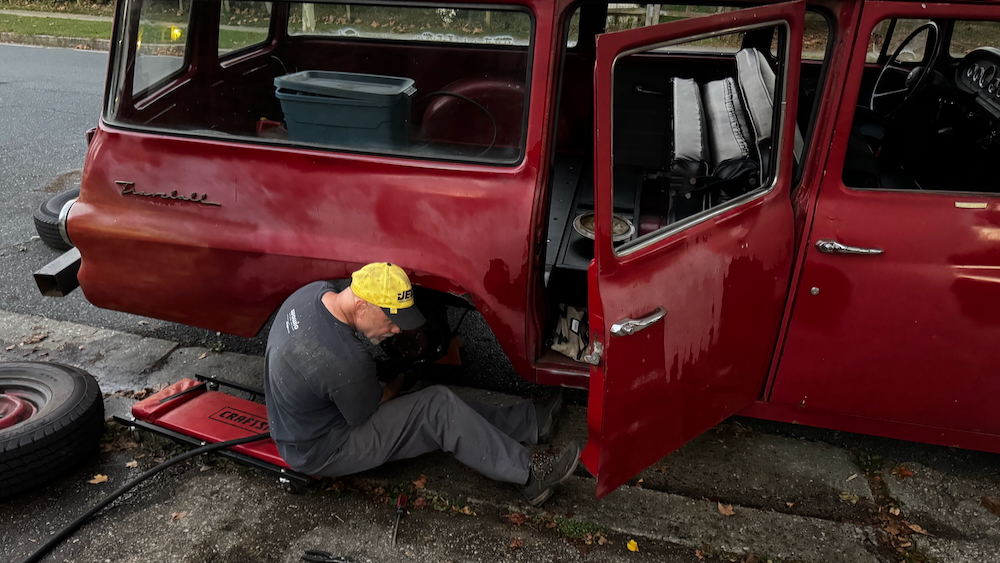
Radio, Radio

Looking ahead to the days when Darth is actually on the road, I was eyeballing the empty hole in the dashboard where a radio once lived, especially now that I’ve got a good power source. As mentioned before I think I threw out the old radio that was with the truck, but I’ve still got a period correct radio from the green Travelall. At first, I thought it was a Ford or Chevy unit based on some very quick research but doing deeper digging led me to a very thorough website with actual pictures and I was actually able to identify it as a Motorola 7SMI, which was standard for Internationals of that year.

This particular unit only had three wires coming out of the back: a black wire ending at one side of a fusible link and two green wires that ended in a terminal connector labeled 22. It stands to reason the black wire was power and I guessed the green wires were for speakers. Much like everything else in the truck, I assumed the whole thing was grounded by the chassis, but none of the service manual diagrams I have for any year showed wiring for a radio at all.

These units were developed at a turning point for car electronics, when things were moving from tubes to transistors and circuit boards, so they are a mixture of the old and the new. This one is filled with old capacitors and sported a phenolic-based circuit board, which was the industry’s first material of choice before they realized it wasn’t resistant to wild swings in temperature and switched to silicon. The 60-year-old capacitors were almost surely fried at this point. On top of all that, it’s only an AM radio.

So the question was: what do I do with this thing? Should I spend hours poring over electrical diagrams, a hundred dollars for fiddly electronic parts, and even more time attempting to desolder and resolder scores of capacitors just to succeed and have a scratchy AM radio that only pulled in rambling religious sermons from Alabama? I think you might know the answer already.

I stumbled upon a YouTube video where a guy gutted an old AM radio and installed a $15 Bluetooth amplifier board on one side, using the knob to act as a stealth controller. This meant disassembling the unit, of course, which bothered the traditionalist in me, but I decided I had nothing to lose.

The electronics on the left side came out relatively easily once I’d cut a bunch of the wires, and I kept all of the stuff I pulled out. Assembling the bluetooth receiver, I bench-tested it and found it paired with my phone almost immediately. So I used some of the leftover metal bracing to bend a new cage for the receiver, widened a hole for the stalk, and mounted it back on the chassis in the empty spot, lined up with the stalk hole. Then I pulled the old stalk pot apart to get the brass rod itself, and machined one side down with a Dremel to fit into the slot on the receiver stalk. With that extra length, the knobs mounted on the front as they did from the factory. Cleaning the whole thing up with some 409 and 0000 steel wool, I made the chrome shine again. Finally, I ganged the power lead to the receiver up with the dial bulb so that the dial will light up when the receiver is turned on.

The only drawback I see is that it’s not very powerful. I’ve spent enough time in 60-year-old trucks to know that you need volume to overcome the road noise, and this unit won’t cut it. So if I want to use it, I’ll have to find an amp of some kind to go between the receiver and the speakers.

The one issue I’ve got is that the faceplate that came on the truck doesn’t fit this radio. The knobs are spaced a little too widely for the existing holes. I could use the faceplate from the green truck but that had a Deluxe dashboard and was covered in black vinyl from the factory. So I could remove that, clean up the faceplate and use it instead. And of course I can find other faceplates at Nationals this year as a longer-term solution.

Update: here are some photos of the cage I build from leftover parts. I widened out one of the existing holes with a Christmas tree bit to accept the stalk of the bluetooth receiver.

Posted on   |     |   5 Comments on Radio, Radio  |  Posted in Electrical, Travelall

Superbowl Preview

Sunday was a day of tying up some loose ends from the last couple of weeks in between snowstorms. We’re supposed to be getting a major accumulation this coming week so I wanted to get in under the cover, get some stuff buttoned up, and prep it for the weather.

First off, I drilled holes in the cupholder mount and the seat base and installed it with a couple of 5/16″ bolts. I’ve been waiting to do that for a long time, and it really looks good there—even in etching primer. I’m toying with the idea of taking it to be powder coated in black for some added durability.

I grabbed the bracket for the fuel filler hoses, pulled the fender off, and took some time to install it, the new hose, and a refurbed filler cap ring on the temporary fender. It all fit well, with the hose from the tank being maybe 1″ too short on the long side, but it’s good enough to reach the filler neck. So everything is ready for when the good fender gets sprayed and is ready to install permanently.

Then I used some zip ties and a wire holder to tidy up the fuse panel install from last weekend, moving the jumper wire up behind the heater plenum and directing the bundle from the panel upwards and out of the footwell. That made a big difference behind the pedals.

In the garage I fished out a sheet of 18 ga. steel, traced the pattern I built last weekend for the seat mount out, and cut it down with the angle grinder. When it was roughed out, I trimmed the sides down on the bench grinder and prepped it for the brake. I don’t know when I’ll get back out to Brian’s again but that will be another good project to dive into.

Finally, I wire wheeled the last three headliner bows and cleaned them up for etching primer. All five are now ready for a coat of the interior gray I used on the door cards, which will have to wait until springtime.

Posted on   |     |   Leave a Comment on Superbowl Preview  |  Posted in Electrical, Travelall

Licensed Electrician

I had a windy, chilly Saturday to myself this weekend, and made the most of it in the time I had. There were several things on the punchlist I wanted to take care of, and I got a fair bit of them done.

First up, I pulled the Scout out and idled it in the driveway. While it warmed up, I pulled the old parts out of the back—the flywheel and clutch will go back to IHPA at some point for the core deposit, but I have to figure out how to get it to them. Just mailing the flywheel will cost more than a new car, so I think I’ll plan to meet them at Nats this year to do an exchange.

While that was warming up, I cleaned up the garage a bit to make things easier to walk around. It’s really getting crowded in there. When that was done, and after the space heater had taken the chill out, I sprayed a bunch of parts with etching primer to get them ready for paint, and looked through my bins for a couple of things to work on in the basement.

Then I lowered the tailgate on the Scout and spread the contents of my electrical box out to start work on the fuse panel. I’d already made a pigtail on the end of some 8 ga. wire for the battery side, and measured and cut down more to install an inline fuse next to the battery. I found a good place on the firewall to mount the fuse panel and snaked wire in through one of the grommets, then soldered connections to each of the leads from the relay. Looking over the electrical diagram for the truck I found that the heater box was on the accessory circuit, so I wired a lead to the back of the fuse panel and connected it to the relay. With the whole thing grounded, I temporarily hooked up a new 12-volt charging plug to one of the circuits in the fuse panel, connected the battery, and turned the key: Success! By this time the sun had gone down and the wind was blowing cold, so I cleaned up my mess and closed up the truck. But: Success! Now I’ve got the ability to add some more accessories to the truck.

Back in the warmth of the garage, I wire-wheeled two of the headliner bows to bare metal and sprayed them with etching primer. Then I pulled the driver’s seat base down from the attic and brought that inside with the original fuel pump from the truck and closed things up outside.

Down on the workbench, I set up a Hobo Freight spot weld cutter and started to disassemble the seat base. It’s more complicated than it looks, but came apart relatively easily (practicing on Darth’s cowl and both quarter panels of the Green truck gave me a lot of practice). The section I need is a triangular support that sticks out toward the rocker which looks like it would be a rectangle but is actually a parallelogram to match the slope of the floor both front to back and side to side. I took measurements of the seat base and started cutting up some cardboard, making a rough template with some painter’s tape. Then I cut a better version and set it up to lay flat so I’ll know how big a sheet of steel I’ll need to cut. This one is going to be a bitch to bend—tougher than the lockbox lids, because it’s a giant C-shape that won’t fold cleanly under Brian’s brake. I’m going to have to get creative with how I do this.

Finally, I soaked the fuel pump in oven cleaner and washed it off in the shop sink. It cleaned up well, but needs a rebuild kit. It’s an old-school Carter 3405 with an integrated filter in a second chamber; originally this would have come with a glass sight bowl, but the one I have is silver. If I have some extra time I’ll see about getting a rebuild kit and replacing it on the engine.

Chasing Daylight

The forecast for this weekend was for warmer weather on Sunday, which was great news. I got a very late start though, because we had a lot of family and house stuff to take care of first, which meant I only had a couple hours of daylight to work outside.

before and after

First, I scraped off the blobs of silicone and welded up the driver’s side of the transmission tunnel. This side had been drilled out in three places, probably for some kind of radio mount and the associated wiring, so it took a little more time because I had to cut out three round plugs to weld in place. I used 16ga scrap steel to match the body shell and quickly had the patches tacked in. With patience I welded them all the way in and ground things smooth. With some rattle-can IH red it’ll look like new. I figure if I’m going to be featuring my fancy cupholder in pictures to try and sell a couple, I’d like for the truck to not look completely like shit. I don’t know why I didn’t do this over the summer when I welded the passenger side up.

The second thing was to sand down a second application of epoxy to the spare steering wheel. This was to smooth out some low spots left after the initial application. The whole thing needs a careful finish sand to get it extra smooth before I shoot it with primer, but I’ve got to replenish my sandpaper supply first.

Finally, on the bench in the basement I’ve got all the parts collected for an auxiliary fuse panel: the fuse box, a relay and pigtail, 25 feet of 8 gauge wire with ring terminals, and an inline fuse block. I soldered a ring terminal to the end of the wire with a propane torch, and today I’ll measure it out to install the inline fuse and the rest of the wire, as well as figure out where the fuse block will live.

Posted on   |     |   Leave a Comment on Chasing Daylight  |  Posted in Electrical, Welding

More Light

This may sound like a simple thing, but simple things are giving me joy in a dark time right now: I’ve got working brake lights. After spending the time and money to source a new wiring harness, pull out the dashboard, swap in the wiring, and replace everything, I was much closer to a street-legal truck:

  • All four running lights work.
  • The headlights work.
  • The turn signals work, after some grounding issues.
  • The dash lights all work.
  • The heater works.
  • The license plate light works.
  • The truck starts from the key.

But that wasn’t everything, and there was one major roadblock:

  • The brake lights didn’t work.
  • The high-beams cut off the running lights; this isn’t a dealbreaker.
  • There is wiring for a dome light, but it’s constant power right now—there’s no way to turn it off.
Brake test

Doing a little research, I realized I’d swapped the old brake light switch from the original brake master onto the new one, and most likely it was broken or clogged. I found a new one on Amazon (after some dedicated research) and swapped it in this afternoon. In two  minutes, I had working brake lights.

So next up, I’m going to sort out the dome light situation, and wire three in parallel—two over the seats, and one for the rear cargo area. And as I mentioned before, I’ve got a plan for an additional fuse panel with switched power for more accessories.

Posted on   |     |   Leave a Comment on More Light  |  Posted in Electrical, Travelall

Snow and Welding

Here’s a video recap of the last two weeks. It’s been kind of slow because of the weather, but I’ve tried to keep busy with some mostly) indoor projects. I’m very pleased with the cupholder project, and I can’t wait to get back out and finish welding on the valance panel.

Posted on   |     |   Leave a Comment on Snow and Welding  |  Posted in Travelall, Video, Welding

Welding Practice

Here’s what I got back from SendCutSend last week, in the form of three laser-cut and brake-bent sections of 16 ga. steel:

And here are the pieces assembled and welded:

I had to trim the top section of the parallelogram just a hair to get it to line up with the underside of the main cupholder, but other than that, the whole thing went together as smooth as butter. Welding things up took about an hour after I’d squared it all, and I wire-brushed everything down in preparation for paint. I ran out of time before I could take it outside and test-fit everything, but I’m stoked with the progress so far.

Posted on   |     |   2 Comments on Welding Practice  |  Posted in Travelall, Welding

Cold Weather Projects

Cold-weather welding

I braved 20˚ weather to sit in the back of Darth and weld in the valance above the barn doors on Sunday morning. The idea was to get out ahead of the weather before it dumped a predicted 6″ of snow on us, which it’s currently doing. It was a bit tricky, as I think the metal was cold enough that it didn’t promote clean penetration in the smaller plug welds I drilled, but I got the majority of it on and ground down for paint. I’ll have to do a little filler work to clean up a couple of places when it’s warmer as well.

On the brake/electrical front, it turns out the brake master from the green truck has an entirely different switch system (my guess is that the switch was on the pedal assembly but I haven’t checked that) so I had nothing to swap in and test. I did finally track down the part I need, Standard Motor SLS30, and ordered it via Amazon. So after we’re dug out and the project I’m managing at work is done, I can test it out.

I’ve been doing a lot of research into wiring in an additional fuse panel for accessories, and I think I’ve got a good idea of what I need and how it works. It’s actually pretty simple; I need a new panel wired up to a 30amp relay, which is then connected directly to the battery and a ground. The fourth wire goes to the accessory circuit on the existing panel, which acts simply as a switch. Turn the key on, and power goes to the new panel. All of the load goes through the new wire into the new panel, ensuring I don’t burn the truck down by overloading the old wiring harness. My truck was spec’d for a larger alternator but I have no idea if the used wiring harness I have was made to handle that increase in power. I’m going to over-engineer it so that I’ve got room to expand with things like A/C, a backup/rearview camera and electric steering, but for now just having some accessory plugs will be great.

Down on the workbench, I carefully drilled the lockset out of the barn door handle from Darth and laid the parts out. The used barrel I’ve got will not stay in the handle with the key in the lock, so I think I’m going to have to bite the bullet and order a second lockset keyed to the existing door locks. I was really hoping I could get the used barrel to work but it’s just not happening. The handles attach to the door with two threaded rods which were rusted solid to the retaining nuts, so I soaked them for two weeks in PBblaster. I put two new nuts on the rods, torqued them tight to each other, and used them for leverage to spin the rusted nuts off. The rods were  soaked clean in Evaporust and are now mounted back on the handles.

While I was diving back into locksmithing, I pulled out my spare Scout II T-handle assembly and looked it over. There’s a method for popping the lock out with a thin rod that compresses a brass retaining clip on the barrel, but no amount of PBblaster or lithium grease would free that clip up. So I drilled the face of the lock and pulled the top 2/3 of the barrel out. It was in such bad shape that the bottom 1/3 took some digging to pull out, but once it separated the handle was easy to clean up. If my lift gate latch closed all the way shut I’d look into buying a new barrel for this, but it doesn’t so there’s really no point.

2024 In Review

In January, I was looking at pictures of pretty new upholstery for the Travelall and making plans to clean up the seatframes for new foam. It’s December and I’ve just now got the seats finished and installed in the truck; in the months between I got a lot of projects done. Here’s a recap:

Early in January I finally got around to making some T-shirt designs for Travelalls and Scouts, set up a Threadless storefront, and did some initial posting on social media. The response was pretty good; I need to make a new push this coming year, as well as update some merchandise.

I got serious about building out a YouTube channel for the red truck, and started posting videos about every two weeks. The channel points back to the Threadless site, and I get a couple of orders a month. Also, I made a dedicated Instagram feed for the red truck.

From January into February, in between cold snaps, I finished sanding and painting the passenger fender I rebuilt the fuel hose port on; that project went much better with the experience I’d gained doing previous bodywork projects. The fender is now hanging in the garage waiting for some other parts to be shot with IH red, and will then get clearcoat.

March was a big month: I took possession of an unwanted, untitled green Travelall in Pennsylvania with a ton of help from Bennett, and we dropped it in the driveway in front of the red truck. This project sort of took over the next two months as I worked to tear it down and part it out before the neighbors complained and had me hauled it hauled away. I had the entire truck stripped down, the parts organized, and the carcass ready for towing by April 30. And I made a crisp $100 on it!

Also in March, I ordered and got a used, tested and labeled wiring harness from the Scout Connection, which wound up being for a later model year. I returned it for a proper 1962-62 harness which was tested and labeled, and later on in the year I pulled the dashboard from the red truck, cleaned it up, and swapped the new harness in place. Putting it back in was easy, as I’d already taken two of them apart, and when I tested it out about 80% of the electrical system came back online.

The firewall got cleaned up and covered in heat matting, an upgrade I found very useful in the Scout, and during that process I finished cleaning up and painting the cowl vents I’d fabricated in 2023. I also pulled the heater box out and disassembled the whole unit. The rear of the box had a fair bit of rust damage, so I welded new sections on to the sides and back, reassembled with new hardware, and got it ready for paint.

August was a big month. First and foremost, Brian and I drove the Scout 1200 miles round trip to Harvester Homecoming at the IH plant in Fort Wayne, Indiana. We had a great time, met a bunch of new people, and were lucky to have good traveling weather, although our first evening at the event ended in a downpour that had us running for the exits. The Scout ran great, but I noticed she was leaking a lot of oil out the underside at speed.

When I was back, I took a week off from work and spent a couple of days prepping the roof for primer and paint. I’d left it sitting since last summer so it needed some attention before fall. I re-worked the sections that needed help, finish sanded the whole thing, and shot it with pro-grade primer from an HVLP gun. When that was cured I sprayed it with two coats of two-stage PPG white, and I think it turned out really good.

I worked on cleaning up each of the doors, installed weatherstripping, welded over the mounting holes from old mirrors, and rebuilt both of the West Coast mirrors I’d bought last year. They got mounted permanently on the truck.

Finding vendors willing to work on old iron is hard. I wanted to use the same guy who installed the passenger side glass to replace the dry, cracked gasket on the driver’s side, so I spent the money on new rubber and his expertise to have it put it in.

In September I had some gray single-stage paint matched from the old door cards and sprayed out four replacements as well as the heater box, then sprayed it all with a matte clear coat. I really like the results. When they were cured, the heater box went back in over the heat matting and was hooked up to the engine.

I donned a Tyvek suit and scraped all of the fiberglass off the roof, treated it with Rust Converter, and installed some lightweight heat/sound matting.

With those things done, and looking at another month of reasonably decent weather, I got a wild hair up my ass and dropped the fuel tank to survey the underside of the floorpan. The fuel tank is in fantastic shape, and got wire-wheeled, cleaned out, and repainted. The passenger floor, which featured the worst rust remaining in the truck, was trimmed away until I found clean metal. I welded a new sheet in place, and cut sections of the lower firewall out until I had good metal there.

I came into possession of a second steering column, this one from a manual steering/column shift truck, and an electrical steering unit from a Nissan Versa. This is the starting point for an electric steering conversion sometime next year.

Before Thanksgiving, I dropped the Scout off at a transmission shop nearby who had been recommended by another truck guy I met at our local Cars & Coffee. She’s been there waiting for a spot in his bay since then. He got her up on the lift two weeks before Christmas and recommended a new seal kit for both the transmission and the transfer case. While he had those two off the truck, he sent me pictures of the flywheel and clutch, and recommended we swap those out while we were at it. As of December 26 he’s got all the parts he needs to finish up the job.

With the weather getting colder, I got materials in the door for the seats and spent a couple of weeks redoing the upholstery on all four sections. This involved tearing down the rear upright from the green truck and using that frame, but all of the other frames I’d prepared worked out perfectly. When that was done, I bolted the lockbox in the back of the truck and installed the seats.

In between all of that, there are a million other smaller projects that got done. The frame under the passenger side was needle-scaled and painted. The adhesive from the old carpeting has all been removed. The door locks up front have been replaced. The front bumper  from the green truck was installed. The license plate light got mounted on the rear door. The outside lights all got dedicated grounds run to the body. I’ve got turn signals and headlights, but the high-beams still don’t work and they cancel out the running lights.

Looking back on it (and looking at it in the driveway) I can see a lot of progress this year. The first year, a lot of the labor was hidden but this year I can see big cosmetic improvements happening. The push for this coming spring will to be getting it on the road. I know the transmission is good, because she’ll move when she’s in gear and I bump the starter; for some reason the clutch pedal isn’t working. More on that later.

Cold Weather Projects

It’s been hatefully cold this past week, and we’ve had a full pre-Christmas schedule so there hasn’t been much I could do on the trucks. However, I did eyeball the rear valance panel sitting in the rear bed and it sparked an idea. I brought it and the panel from the green truck into the garage, set up the welder, and started pounding the twisted metal back into place. When it was all flat, the holes were smaller and circular, just large enough to be a pain to close up, but too small to find easy plugs to fill.

Cold, cold welding in my janky-ass garage

I used the copper backer and started slowly filling each of the smaller holes, then cut a square hole around the really mangled section in the center. When I had the settings dialed in, I cut square sections out on the sides, and plugs out of the green truck valance to fill things in. Ordinarily I would have just fabricated my own, but these have a compound curve as they push out to the edges that I figured would just be easier to cut out of the spare piece.

After some trimming I got them both tacked in and then spent the next hour jumping back and forth with a couple of welds on each side, then swapping to let things cool while I tacked on the other side. As of Sunday evening the piece is a bit warped in the center and needs some flattening, but the main welds are complete. Tomorrow I’ll get it straightened out, then wire wheel off the surface rust and old paint, and skim it with some filler.