
So I put the spare up on a brick, remounted the J-hook and called it done. I have to get some larger stainless bolts for the license plate and run the wire back up into the tailgate.
So I put the spare up on a brick, remounted the J-hook and called it done. I have to get some larger stainless bolts for the license plate and run the wire back up into the tailgate.
Taking advantage of the warmer weather, I hoisted the traveltop off the Scout this Saturday. After some experimentation with my first soft top (a snap-top Kayline) I bolted the hardware for the black top back on and got it back on. Then I thought I might take advantage of some spare time to replace my steering wheel. I called up an old post to find the relevant information and got to work.
Pulling the plastic covers off went very easily, and I made it down to the locking bolt with no problems.


Then I found I had the wrong bolts to go in my column, so Finn and I ran out to the store to get the proper size and thread. Lowe’s didn’t have much in their 1/4″ fine thread selection; the best I could do was 2 1/2″ in stainless steel. When I got it home they went in the column easily, but the center punch screw immediately went off course as I started threading it. I put a wide extension on the end of the punch but that didn’t help, so then I threaded the locknut back on about a quarter turn, hoping it would hold the punch in place. That just made the whole assembly bend at an alarming angle, and the last thing I want to do is snap a bolt off in the column, so I backed it all out and put it back together.


It’s clear I need a more precise kit to get the proper amount of pressure on the column; I’ll have to see if I can rent one from somewhere–but first I’m going to buy a turn signal cam and a new lock barrel and do the whole column at one time.
Update: two things–firstly, I need to flip the crossbar of the puller so the flat side is out. Duh. Secondly, I may have a Jeep wheel here, in which case the dinged-up center section is replaceable on eBay if I search for Jeep OEM steering wheel CJ7 1980.
There hasn’t been much progress on the Scout front since the fall meetup, but small things have been happening. Santa brought me a couple of truck-related goodies, starting with a new tool wrap to replace the canvas one I was using before. The first one is heavy-duty but fat and unwieldy, and there’s noplace to put sockets. This one is made of heavy nylon and features a socket section as well as two sets of pouches, two sturdy cliplocks and a handle for carrying. The second is a book on engine rebuilding, which doesn’t answer every question but goes a long way to explaining the basic concepts.
I also updated the to-do list, which hadn’t been touched since last spring.

I’ve had the liner in for a total of two weeks, and here’s my report.
So it’s in; I’m relatively happy with the results but I wish I’d had more time to experiment with the compressor and think through the application.
Sunday morning I got up early, helped get Finn fed, and then hustled outside to get to work. Brian T. drove all the way out from Chestertown with his compressor and we sanded, scuffed, cleaned and taped off the whole truck. As I was finishing up some final scuffing, Brian looked up from the liner kit and said, “I think we have a problem.” Al’s Liner is a 3-part system, the first of which is an adhesion primer that came in a plastic bottle. My cursory check of the kit last week failed to reveal it had frozen solid after two years in storage. Being a specialty kit, nobody open on Sunday has it in stock, and all the other commercial liners are 2-part systems. Grudgingly, we wrapped everything up under plastic. I’ll call first thing tomorrow and see if they can overnight me a new bottle, in which case I’m going to try and shoot it on one night this week. I hooked up a trio of lights under the tent that should provide enough coverage to see the whole thing.

After everyone took off, I took Finn swimming in the neighbors’ pool and drank a beer to cool off.

Many thanks to everyone for their help this weekend- both Brians went above and beyond and I never would have made it this far without their help.

A few months ago, I took off a Friday from work so that I could put in a three-day weekend installing bedliner on the Scout. With the help of some excellent friends and a lot of hard work, I got it very close to completion.

Friday morning I pulled the truck out and attacked it with sanding discs. Much of the paint on the bed came off quickly and easily. Both front seats came out as easy as the day they were installed, which was shocking. I’d replaced all the rollbar hardware with Grade 8 bolts, so I knew that would come out without a problem. I’m going to have to use a ratchet strap to pull the feet together just a hair before it goes back in; the mounting plates scuffed the paint on the walls when I pulled it out.

As I got closer to the front, the PO’s paint job got thicker so the going got slower.
This is what I found when I ground the bolts off the metal strip holding the weatherstripping down. There was carpeting underneath, which leads me to believe these had never been taken off before. I ground the bolts down to the floor and cleaned out each hole with the vacuum.

After Brian H. came by, he dug in and helped me make short work of the front floor and the remainder of the tub:

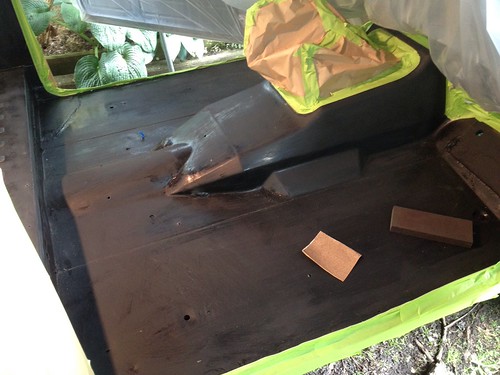
Once the paint was off, we used Marine Clean and Metal Ready to prep the bed, and then rolled it into the sun to dry out. Then it was time to paint:

Here’s where we ended up at 7PM this evening. If Brian hadn’t come over, I definitely wouldn’t have gotten this far.
I spent the entire day inside behind a computer working, but took an hour out to go outside and grind some paint off the bed of the Scout. I’m using a Norton wheel on my 4.5″ angle grinder, and the paint just seems to fly off with little or no effort. In about 45 minutes I got a good patch of the bed cleared off, including all of the hard-to-reach channels between floor ribs. Now I have to figure out how I’m going to prep it for eventual bedliner; the current plan is to wash it down with etching cleaner and then POR-15 the whole surface. Before that happens, I have to figure out what I’m going to do with the areas that are pinholing–there are several spots in front of and behind the wheel wells that I can see daylight through. Maybe I just fill them with weld and sand things smooth?


One thing is for sure: this is not a clean job. I was wearing a high-quality dust mask, eye and ear protection, and I still came away covered in particles. I think a big box fan will be the order of the day for my next attack.
I ordered a quart of POR-15 and a supplemental bottle of Prep & Ready (cleaner/degreaser) this morning while I had a free shipping coupon. Now, to make more time to sand…
So the snaps I bought from West Marine last fall have proven to be pretty worthless. Only one out of a total of twelve will stay connected for more than ten minutes; the brass rings inside the cap section just don’t hold well enough.
I did some research online and plugged some new search terms into the Googles; I came upon a commercial manufacturer who makes Milspec snaps and then a distributor who sells them by piece. They showed up yesterday and they are as strong as advertised. A test with the install pliers I got with the West Marine kit was successful, but I think I’m going to use the punch I got in a repair kit from Kayline years ago.

I got 20 11/64″ snap button barrels, 20 sockets (hard action), and 20 3/8″ #8-32 machine screws. “Hard Action” sounds sexxxy but only means it takes a lot of force to get the snap to connect and release. So now the screws will face inside and the door flaps will fold underneath and snap to the inside of the door frames.
Update: The punch worked perfectly. I’m short two nylock nuts for the passenger side but everything is installed and the snaps hold the way they should. Problem solved!
Another thing I got to this weekend while Finn was asleep was to pull out the A/C ductwork under my dashboard. It was inoperable when I got the truck, although there was power to the blower fan. There was no compressor on the engine and the supply/return hoses had been cut just outside the firewall. Figuring it would be a number of years and several Lotto tickets before I’m able to buy an aftermarket A/C system, and because I’d like to get under the dash itself to replace bulbs and fix electrical gremlins, I decided to yank it out.

The vent bar came out easily (in part because one of the bolts was already missing) and the PO had thoughtfully installed quick connects on all of the wiring. Once that was out, I tackled the condenser unit under the passenger’s side. This was trickier because my glove box latch is hopelessly broken, so I jimmied that open, removed the box liner, and pulled the door off. There are four bolts holding it onto the firewall, three in the wheel well and one in the engine bay. They all came off so easily I had to look around to see if anyone was pranking me.

Once that was disconnected and the hoses underneath came off, the whole assembly lifted right out. It’s definitely seen better days. The picture here doesn’t show five pounds of dog hair and mud caked into the rear of the condenser unit.

Now I can get underneath and sort out the wiring, replace all the bulbs, and (possibly) even pull the purple dash off and replace it with the black one I refinished four years ago. But I’ll have to be careful not to anger the Scout electrical gods.
It’s definitely a version 1.0 and there’s a lot to be desired in the execution, but I got the top off today by myself without having to call in any help.

Right now it hangs in the back of the available parking area of the garage , which means I can’t back the Scout in with the soft top up. I think the next iteration might involve a winch and a stronger bracing system for the top itself, and some way of scooting it backwards before it gets hoisted up. Maybe I can make some simple sawhorses and walk it backwards onto those before it goes upwards. I’m definitely going to add a third set of ratchet straps to the current setup to sleep soundly at night.

The soft top hardware is tacked in place, but I’m headed out to the store tomorrow to buy stainless hardware to mount the rails before I put the canvas on. I was tempted to put my snap top on (and I still might) but time got away from me today and I still had to clean up.