Brian, tired of me texting him various Marketplace links, suggested I make a vision board for what I’m looking for in a new project, which I thought was a pretty good idea. My search has centered on one of two types of truck; I’d like either a Scout 80/800 or a ‘61-‘68 C-series pickup.
I’ve always liked the look of the original Scout; it wasn’t until I’d done the research to buy Chewbacca in ’96 that I learned about the earlier model. It looks great with or without a top, and even better without doors; I like the utilitarian vibe and would actually prefer something as close to 60’s spec as possible—wheels, tires, suspension, etc. but with a rollbar, 3-point seatbelts and maybe an upgraded powerplant. As a platform designed in the late ’50’s, it’s even more utilitarian than the Scout II, little more than an engine, transmission, steering wheel and a seat. As they iterated on the design it got things like power steering and electric wipers and a choice of engines, but the majority of them were basic, no-nonsense trucks.

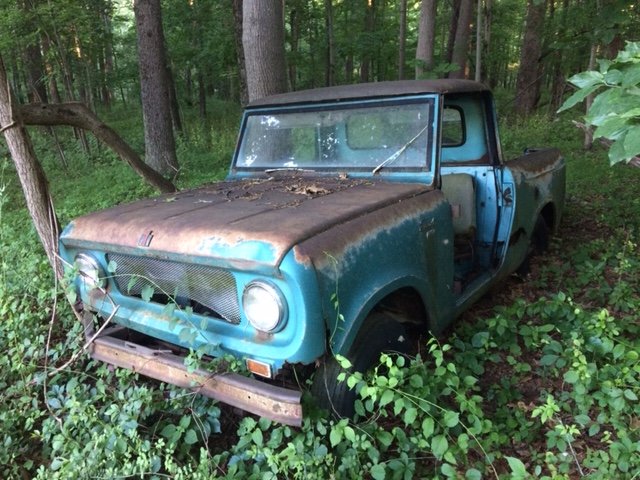
This is a nice 1966 2WD with a 3 on the tree.
With the pickup, my favorite are the final design iterations of the C-series trucks. They started out with a face only a mother could love but were restyled in ’61 to a much more pleasing design, and the improvements to the dashboard and interior made a huge difference. There’s something delightfully ’60’s about the styling, and the interior is also no-nonsense. There have been a few D-series trucks I’ve liked but they are usually not my cup of tea, and it’s hard to love the cab design.
For a Scout, I’d like to find a body that’s not Swiss cheese. If the floorpans or rear bed are holed, I can work with that. If the rockers are gone, or if the outside sheet metal is damaged, I’ll have to really think about it. Early scout sheet metal is rare, and if I can’t source replacements I’d be fabricating what I need. If it’s missing doors, that’s not ideal but it’s ok. I don’t care about seats. If it has a top, that’s great but it’s not a dealbreaker either—but havng a top usually means it hasn’t been completely exposed to the elements for twenty years.
This Scout is very local but I’ve never heard back from the seller, even though the ad is still up on Marketplace. It would be worth the short drive and small sum of money just to drag it home and see what’s savable on the chassis.
I’d like for it to have enough sheet metal that I can cut away the bad stuff and still weld good metal to; if the cancer is so bad there’s nothing to work with, that’s a hard pass.

This Scout is in Maine, which is too far to drive just to look over a worthless carcass.
In terms of running gear, the ideal would be a V8 installed, but I don’t care if it’s running. a 4-cylinder will take more modification to fit a larger engine, but isn’t a dealbreaker. It’ll have the weaker Dana axles as standard equipment but that’s not an issue either. And I don’t think many early Scouts came with an automatic, so a manual would be perfect, even though it’ll be a non-synchro first gear. I prefer a stick, and I like the added bonus of theft deterrence. I will avoid any cobbled together suspension mods; if someone has attempted a spring over or backwoods lift kit, I’ll walk away.

This one looked very good from the pictures but was shot through with rust almost everywhere.
In terms of looks I’d prefer if I didn’t have to deal with some asshole’s spray can camo job, or a full Rhinoliner treatment over the paint. The more patina the better. If the original paint is half worn away, that’s actually perfect. Anytime fresh paint has been applied the price goes up by the thousands, and I almost always don’t like the color they’ve chosen anyway.
Running or not, I’d like for it to be within a three hour drive from here, but I won’t mind if I have to go a little further for the right truck.
For a pickup, the ideal is a 2wd full-length with a V8. The key is the cab. I want something with clean cowl vents, as that’s the hardest area to fix. The second hardest place would be the cab corners which are all compound curves.

The glass isn’t impossible to find, but not cheap. If the floors are holed, that’s fine, I wouldn’t practice cutting and replacing them—within reason. I’d like for the fenders and hood to be in decent shape, as the sheet metal isn’t easy to find either.

This one looked very good from the pictures, but when he sent me detail shots it got very ugly very quickly.
For the bed, I’d like to find a full length example, either fleet or a stepside bed. If there’s some damage, that’s ok, I don’t mind cutting that out and repairing it, and ultimately I’d strip the whole thing and bedline the shit out of it anyway.

This truck was for sale last winter, and I should have jumped on it when I could. It’s pretty much perfect in my eyes.
For the running gear, there are a million different possibilities. I don’t really mind any engine variation, but if it’s an inline 6 that will make replacing it a little harder. I do want a manual, and in a perfect world it will be a floor shift, not on the column.

I’d love to find one with power steering. The trailer special I looked at in PA was the perfect drivetrain combo- a V8 floor shift manual with power steering, but the clutch was fucked and the engine was locked.

Here’s the Holy Grail: a crewcab C series in fantastic shape. If I had $16K of disposable income I’d already own it.
For the looks of the thing, my ideal is the same as the Scout—original paint in any condition is preferred, and actually the more faded the better. I don’t mind some dents but I don’t want a demo derby loser either.

This is a fancy model; look at all the chrome spears on each side. It’s a 2WD based on the hubcaps.
The goal is to own something I’m not afraid to drive; a 100-point paint job would ramp my anxiety up enough that I’d never take it out of the garage. Scrapes and dings and patches aren’t discouraged. I’d like something that looks well-loved but not like it’s held together with duct tape.
The best case would be a roller with minimal modifications from stock, where I can get in and fix rust and damage at my leisure while hopefully keeping it running. I’d like to get whatever I buy into resell shape, or something I can had off to Finn for her high school vehicle. Brian is still moving forward with his plan to electrify vehicles, and with either one I’d entertain either an EV or an LS swap happily.
Several possible trucks have come and gone; there have been a couple that are 75% of what I want but have some things I’m not interested in, or the rust is too much to deal with. I’m going to bide my time and be as patient as possible, and hopefully the right truck will come along.


